This Barrie 360 content is brought to you by United Lumber Home Hardware
As the weather gets nicer, you’ll probably be looking for fun ways to spend more time outside. The good news is, there are tons of outdoor games you can play with friends and family … no matter your age.
Even better, many of these games can be made at home with basic tools and supplies. Here are 5 great outdoor games that you can make at home for hours and hours of fun. We’ve included basic rules, tool and material lists and instructions to help you get started.
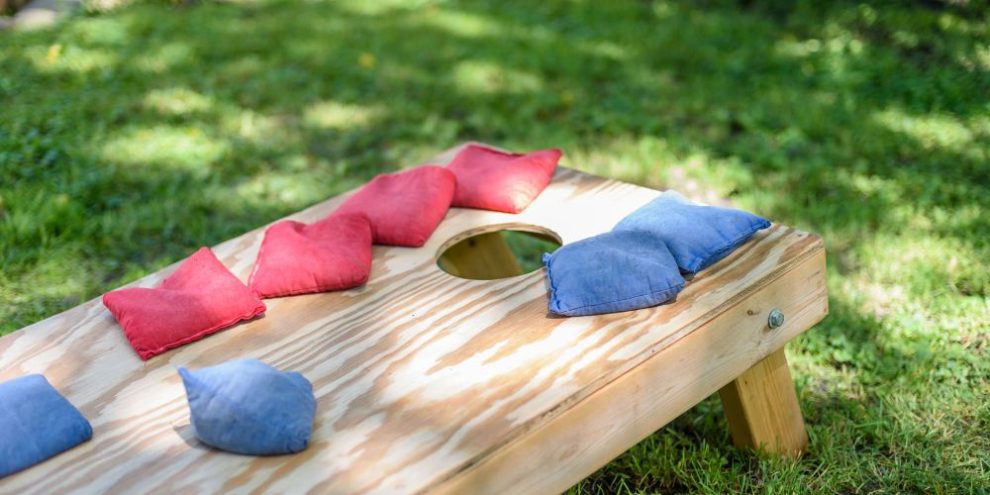
1. Cornhole
Cornhole is one of the most popular backyard games. To play, players take turns tossing corn or bean bags through holes in a wooden platform until someone reaches 21 points.
To set up the game, place cornhole platforms so that the holes are 33 feet apart. If using standard cornhole boards, the front of the boards should be 27 feet apart. Standard boards are 2’ x 4’ with the center of the hole 9” from the top of the board. The height at the top of the board is 1’ off the ground.
How To Play Cornhole
Each person gets 4 corn bags. Standard bags are 6”x6” and weigh 14 to 16 oz. When playing 1-on-1, both players play from the same platform. Opponents take turns throwing one bag until all bags are gone. You can throw from anywhere behind the front of the cornhole platform. Once all the bags are thrown, both players walk to the other platform and pick up their bags and throw again.
If you are playing for fun and not by league rules, one player can stand at each platform and you can alternate which colour bags you use each round.
You can also play cornhole in teams of two. Each team member stations themselves at a different platform, diagonally from each other. Players at the first platform alternate throws until no bags are left. Their teammates at the other platform then pick up the bags and alternate throws. Play continues back and forth this way.
Scoring: In the hole = 3 points; on the platform = 1 point
How To Make Cornhole Boards
For a basic cornhole board you will need:
Materials
- 2 x 2’x4’x½” plywood (can buy this pre-cut or get a 4’x8’ piece and cut it)
- 4 x 2x4x8’
- 2-½” Wood Screws
- 1-⅝” Wood Screws or nails
- 4 x ⅜”x4” Carriage bolts
- 4 x ⅜” Washers
- 4 x ⅜” wingnuts
- Sandpaper
- Wood glue
- Stain or Paint
Tools
- Jigsaw
- Circular saw
- Measuring tape
- Drill
- ⅜” drill bit
- ½” drill bit
- Drill bit to predrill screw holes (7/64” for #10 screws and 3/32” for #8 screws)
Instructions
Here's how to build your own cornhole boards:
- Cut wood
Cut each 2x4 into the following using the circular saw
• 1 x 48”
• 1 x 21”
• 1 x 13”
When you are done, you will have 4 pieces of each length. - Sand wood
Sand the edges of your wood pieces.
- Drill holes
Take the 48” pieces of 2x4 and drill ⅜” hole 4 inches down from one end of the board.
- Make frames
Make 2 separate frames from your 48” and 21” pieces of 2x4. The longer pieces will be on the outside of the smaller pieces so that the frame is 24” wide. (This is called a butt joint).
Make sure the holes you just drilled are at the same end of the frame – this will be the top of your finished board. Before screwing the pieces together, predrill the screw holes so the wood doesn’t split. Glue joints and screw them together with 2-½” screws. - Attach plywood
Attach the 24”x48” plywood to the frame. You can use 1-⅝” Wood Screws or nails to attach it from the top side. For a cleaner look, you can screw the top on from underneath. Again, you will want to predrill to avoid splitting the wood, if you decide to use screws.
- Cut hole
Once your platform is together, you need to cut a hole into the plywood. Use a compass to draw a 6” hole. The center of the hole should be 9” from the top of the board. Use the ½” drill bit to drill a hole on the inside edge of the circle then cut out the rest with a jigsaw.
- Make legs
Take the 13” pieces of 2x4 and drill a hole 1-¾” down from one of the ends on each piece. Next, you want to round off one edge. To do this, use a cup or compass to draw a curve and then cut it with your jig saw. Use sandpaper to clean up the edge. On the other end of the 13” pieces, make a 30 degree angle cut. To do this, mark one side 2” down and then draw a line from that mark to the opposite corner.
- Paint (optional)
Paint or stain all of the pieces.
- Attach legs
Flip your cornhole board over so the top is lying on the ground. Line the hole of your leg up with the hole on your frame. The leg should be on the inside of the frame. Attach the legs by putting the carriage bolt through the holes then attaching the washer and wingnut.
You can order bean bags online or make them yourself. This video shows you how to make bean bags and a cornhole board. The builder uses professional tools, like band saws, rotors and miters. He also adds some extra steps if you’re looking for a more finished project.
If building your own cornhole set is more than you were looking to do, you can build a simple bean bag toss out of terracotta saucers and paint.
2. Washer Toss
Washer toss is another backyard classic. It is also great for camping or bringing to other people’s houses because it is fairly compact. To play, you toss washers into a target box, which is an open wooden box with a hole in the middle. The first to 21 points wins.
To set up the game, place two washer toss target boxes 20” apart. Feel free to adjust this length based on the players’ skills.
How To Play Washer Toss
Each person gets 4 washers. When playing 1-on-1, both players throw in the same direction, alternating throws. Players can toss from either side of the box but only one foot can go past the front of the box
Once all washers are tossed, both players go to the other box and play continues in the opposite direction.
When playing in teams of 2, there should be one team member from each team at each box. First set of opponents throw the washers, alternating throws. Once all of the washers are thrown, their teammates pick up the washers and alternate throws.
Scoring: In the “cup” = 3 points; in the box = 1 point; lands and stays on edge of cup = automatic win
How To Make Washer Toss
To make a basic set of washer toss boxes, you will need:
Materials
- 1 x 2x4x10’
- 1 x 2’x4’x1/2” plywood
- 4” PVC pipe - you only need 7” in total so buy the smallest length possible
- 2-½” screws (or nails)
- 1-¼” nails
- Wood glue
- Epoxy or strong adhesive
- Stain or paint
- 8 x 2” washers
- Optional - carpet or felt cut to fit inside of box (reduces sound and bounce)
Tools
- Circular saw
- Drill
- Drill bit to predrill screw holes (7/64” for #10 screws and 3/32” for #8 screws)
- Hammer
Instructions
- Cut wood
Cut your 2x4x10’ into:
• 4 x 13”
• 4 x 16”
Cut your plywood into:
• 2 x 16”x16” plywood pieces
- Make boxes
Make 2 separate boxes from your 13” and 16” pieces of 2x4. The longer pieces will be on the outside of the smaller pieces so that the box is 16” wide on all sides. Predrill the screw holes so the wood doesn’t split. Glue joints and screw together with the 2-½” screws (or use brad nailer with 2-½” nails).
- Attach Plywood
Put a plywood piece over the box, line up and nail into place with 1-¼” nails.
- Cut PVC
Cut 2 pieces of 4” PVC pipe 3.5” tall.
- Add carpet (optional)
If including carpet or felt, cut it to fit inside of the box and neatly cut a 6” circle out of the center using a measuring tape to be sure it is evenly positioned. Trim around the edge of the circle you just cut out so it fits inside the PVC pipe.
Put the carpet inside of your box and then put the pipe in the hole. Trace the inside edge of the pipe. Holding the cup in place, remove the carpet. Trace around the outside of the pipe.
If you aren’t lining the box, center the pipe in your box using a measuring tape. The center should be around 6.5” from each side. Trace the pipe on the inside and outside.
- Attach pipe to box
Use epoxy (or other strong adhesive) to stick the pipe down. Apply the glue between the two circles you drew on the base. You don’t want to apply the glue directly to the pipe to prevent it from dripping down the sides. Stick the pipe down.
- Secure the pipe
Apply some epoxy or glue around the edges with a brush or popsicle stick - this will ensure a tight bond.
- Paint
Stain or paint the boxes. Keep in mind the washers will do lots of damage when they are tossed so don’t get too attached to the finish.
- Glue down carpet
If you're using carpet, you'll want to glue it down. You can use the epoxy or a spray adhesive.
Once your glue is dry, you’re ready to play. Use the 2” washers in the material list to toss into the boxes.
If you’d like a visual aid, check out this video on how to make a washer toss box.
RELATER: How to maintain an outstanding year round garden ...
3. Giant Jenga
If you're looking for oudoor games that are easier to make, you have a few good options.
Jenga is a family game night classic. To take it to a whole other level, make an oversized version that you can play outside on a nice warm day.
The goal of Jenga is to dismantle a tower of blocks and rebuild it on top of itself without causing the tower to tumble. Whoever’s turn it is when it tumbles, loses.
To set up Jenga, stack 54 wooden blocks in layers of three. Be sure to alternate the direction of the block with every layer. For example, if your first layer points North and South, the next should be laid down East to West.
How To Play Jenga
Using one hand, each player has to try and take one block off the tower and place it on top. Be sure you alternate directions with each new layer of three you place on top. You can tap or knock blocks before moving them to see if they are already loose.
How to Make Jenga
This game is very easy to make compared to the last two.
Materials
- 6 x 2x4x8’
- Stain or paint
Tools
- Circular saw or jigsaw
- Measuring tape
- Sander
- Pencil
Instructions
- Cut wood
Cut 54 x 10.5” lengths. They must be this length to stack evenly. If the wood you use ia a different size, cut the pieces in lengths that are equal to 3 times the width.
Bonus Tip: Always measure the width. A 2x4 is not 2x4 it is 1.5x3.5, which is why the pieces need to be 10.5” instead of 12”.
- Sand wood
Sand each piece to smooth out the edges and then stain or paint them.
- Make a base
If you don’t have level ground to play on, build a box out of a 2x4 and plywood to act as a base. Make the box at least 12x12, though ideally it will be at least 18x18.
Here’s a video to show you how to make Jenga.
4. Ring Toss
Ring toss is another easy to make but super fun game you can play with your friends and family. To play, you need a ring toss base with either 1 or 5 posts and 8 rings.
Players take turns tossing all of their rings. The first to reach the agreed upon score wins.
How To Play Ring Toss
Each player stands 10’ away from the base and tries to toss all of their rings over the posts. Once all rings are tossed, the player counts their points and goes and picks up their rings. The next player goes.
Scoring for 1 post ring toss: Ring on the post = 5 points; touching the post = 3 points; ring within 6” of post AND closer than opponents = 1 point
Scoring for 5 post ring toss: Each post is worth specific marks (5, 10, 15, 20, 25). You score points by getting your ring over the coordinating post.
How To Make Ring Toss
These are instructions for making a 5 post ring toss game. If you want a single post ring toss game, follow the same instructions but only attach the center post.
Materials
- 1 x 3’x1” dowel
- 1 x 1x3 board at least 3’ long
- 7ft of ½” rope
- 2-¼” screws
- Wood glue
- Paint
Tools
- Jigsaw
- Drill
- 3/16” drill bit
- ⅛” drill bit
- 1” spade bit
- Utility knife
- Sandpaper
Instructions
- Cut wood
First you need to cut your wood. Cut your 1x3 piece into
• 2 x 15”
• 2 x 2.5”
Cut your dowel into:
• 4 x 6”
• 1 x 9”
- Sand wood
Sand the edges of all your wood.
- Drill holes in 15" pieces
Mark the 15” pieces in three different spots.
• 1-¼” from each end
• Dead center (~ 7 ½”)
Drill a hole at each mark on the 15” pieces using the ⅛” drill bit
- Drill holes in 2.5" blocks
Place the 2.5” blocks under one of the 15” boards. Make sure each block is flush with the sides and end. Drill through the hole you put into the 15” piece into the 2.5” block on either end.
- Drill holes for dowels
Take your 1” spade bit and put a mark or a piece of tape ¼” up the bit. This will act as a guide. In one of the 15” pieces, drill a ¼” deep hole at each of the smaller drill holes. On the second 15” piece drill a ¼” deep hole at both ends but NOT in the middle.
- Drill holes in dowels
Insert a 6” piece of dowel in the holes at the end of each 15” piece. Place the 9” in the middle of the piece with three holes.
From the bottom of the 15” pieces, drill into all the dowels, through the holes you already drilled using a ⅛” drill bit. All of the drill holes will stop the wood from splitting as you put screws in.
- Glue 6" dowels in place
Pull the dowels out and put in some wood glue in the holes on each end. You can skip the middle one for now so it doesn’t get in the way. Put the dowels back in.
- Glue 2.5" blocks in place
Put some wood glue on each of the 2.5” blocks and stick them to the 15” piece with 3 dowels.
- Screw on blocks and dowels
From the bottom, screw the blocks to the 15” piece and the coordinating dowels with 2-¼” screws. Don’t screw the center dowel on.
Take the 15” piece with 2 dowels and screw the dowels in place. - Screw everything together
Take the 15” piece with only two dowels and start screwing a 2-¼” screw in from the bottom of the middle hole until it is sticking out the other side about ⅛”. Apply some glue to the top of this board and then place the other board on top cross wise. You will want to line up the screw and drill hole. Put the middle dowel into the hole with wood glue.
Finish tightening the screw. It should go through the two 15” boards and the center dowel. - Paint
Paint or stain the ring toss base.
Paint numbers at the base of each post. The top piece (with three dowels will be 5 on one end, 10 on the other and 25 in the centre. The remaining spots will be 15 and 20.
You will then need to make or buy rings. This video will show you how to make the ring toss stands as well as rings.
5. Yard Yahtzee
Yahtzee is another great game that can be made giant for the backyard. The goal of the game is to make specific dice combinations to score points. Combinations include:
- 6s (add up all dice with 6s on them)
- 5s (add up all dice with 5s on them)
- 4s (add up all dice with 4s on them)
- 3s (add up all dice with 3s on them)
- 2s (add up all dice with 2s on them)
- 1s (add up all dice with 4s on them)
- 3 of a kind (add total of all dice)
- 4 of a kind (add total of all dice)
- Full house (25 points)
- Small straight - sequence of 4 dice (30 points)
- Large straight - sequence of 5 dice (40 points)
- Yahtzee - 5 of a kind (50 points for first, 100 points for additional Yahtzees plus you get to fill in one of your other combinations)
- Chance (add total of all dice)
How To Play Yahtzee
On your first roll you roll all five dice. You can choose to keep as many of these dice as you want. Re-roll the ones you aren’t keeping. Repeat this process once more. On your third roll, you can choose to re-roll dice you previously kept as well.
Add up points according to the Yahtzee card. If you can’t fill in any of the remaining score boxes with your roll, you can use your Chance. Once Chance is used, you have to cross out one of the combinations and can’t get points for it anymore.
Whoever has the most points at the end wins.
How To Make Yahtzee
Yahtzee is another easy game to make.
Materials
- 4x4 wood at least 20” long
- Stain and/or paint
- Sandpaper
Tools
- Circular saw
- Optional - Wood burning tool
Instructions
- Cut wood
Cut your 4x4 into 5 pieces that are 3.5” long. NOTE: A 4x4 isn't actually 4”x4” - it’s usually 3.5”x3.5”, which is why you need to cut them this length to get a cube.
- Sand wood
Sand the cubes for a smooth finish and round out the cut edges so all of the edges are the same.
- Paint
Paint or stain the cubes.
Once dry paint (or woodburn) dots on the dice. Use a real die as a template to make sure the right number is on the right side.
You will need to buy or make yahtzee score cards. You can also use a dry erase board to draw out templates in permanent marker that can be filled out with dry erase markers and reused.
You will also want a box or bucket to roll the dice.
Here's a video showing you how to make it. This builder drills a hole where the pips will be but this is not necessary.
These are just some of the many outdoor games you can make at home.
RELATED: The ultimate guide to home renovations and DIY ...